Replacing the Feed Roller (Tray 1/Tray 2/Tray 3/Tray 4)
The paper feed roller for Tray 1 differs from those for Tray 2/3/4 in form. Identify the tray on which paper feed roller is to be replaced before preparing a new paper feed roller.
The procedure for replacing the paper feed roller for Tray 1 is described here as an example. The same procedure is applicable to those of Tray 2/3/4.
- Make sure that you have everything mentioned below in the paper feed roller set for Tray 1.
- (1) Paper feed roller (with gear)
- (2) Paper feed roller (without gear)
- (3) Separating roller
- (4) Spring

- Pull out the paper cassette (1).

- While opening the tabs (2) on the paper feed roller in the front of the paper cassette outward and slide the paper feed roller (3) to the left to remove.

- While opening the tabs (4) on the paper feed roller in the back of the paper cassette outward and slide the feed roller (5) to the left to remove.

- Attach a new paper feed roller (with gear) to the axis in the back.

- Attach a new paper feed roller (without gear) to the axis in the front.

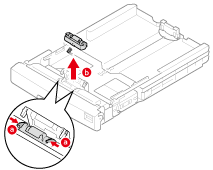
- Remove paper from a paper cassette.
- While pressing the two tabs (6) in the front of the paper cassette, open the cover (7) of the separating roller.

- Press the parts embedded in the projections on the both sides of paper cassettes inward and remove the separating roller and spring.
- Attach a new spring to a new separating roller. (For Tray 2/3/4, use the springs removed in Step 9.)

- Set the spring to the paper cassette and push the separating roller into the paper cassette.

- Fit the projections of the paper cassette into the dimples on the both sides of the separating roller.

- Close the separating roller cover.

- Load paper in the paper cassette and insert the paper cassette into this machine.