Periodic Dots and Horizontal Streaks
Overview
If your prints show thin lines, bands, or rows of dots running across the page at regular intervals, a component inside the printer has surface damage or contamination. This article helps you identify the faulty component and fix it.
Symptoms
- Thin horizontal lines or bands running across the page (perpendicular to the paper feed direction)
- Rows of small dots appearing at consistent intervals down the page
- The pattern repeats at the same spacing on every print
- The issue may appear in one colour only, or across all colours
Key difference from random dots: Periodic marks follow a pattern. If the marks are random and scattered without a consistent spacing, see Black or White Dots on Prints instead.
Diagnose the Problem: Measure the Spacing
Print a test page with a solid colour area. Measure the distance between two identical marks or lines using a ruler.
| Spacing Between Marks | Likely Component | Action |
|---|---|---|
| ~30 mm (1.2 in) | Image drum — foreign particle caught on roller | Run a Drum Cleaning Page. If the streaks persist, replace the drum. |
| ~85 mm (3.3 in) | Fuser unit — roller surface damage | Replace the fuser unit. The fuser cannot be cleaned. |
| ~94 mm (3.7 in) | Image drum — scratch or contamination on the green surface | Clean the drum surface gently with a soft, dry tissue. Replace if marks remain. |
| Across all colours at the same position | Transfer belt — scratch or dent | Inspect the belt surface. Replace if damaged. |
Solution
Step 1: Run a Drum Cleaning Page

Start here. A Drum Cleaning Page removes loose toner and small particles from the drum surface.
Note: Print a test page after cleaning. If the streaks are gone, no further action is needed.
See: How to Generate a Drum Cleaning Page
Step 2: Clean the LED Heads
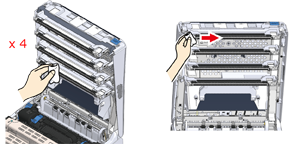
Contamination on the LED head causes vertical white lines, but can also contribute to uneven toner distribution that shows up as horizontal banding.
- Open the front cover of the printer.
- Locate the LED heads — narrow glass strips sitting directly above each drum slot.
- Wipe each LED head gently with a soft, dry, lint-free cloth. Wipe in one direction only.
- Close the cover and print a test page.
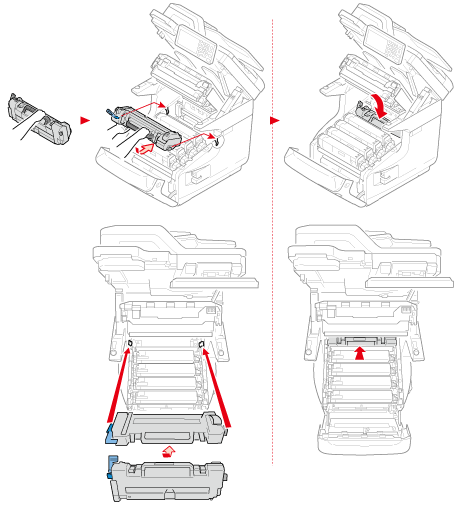
Step 3: Clean the Transfer Belt Surface

If the streaks appear across all colours in the same horizontal position on the page:
- Open the front cover.
- Remove all drum/toner units to access the transfer belt.
- Inspect the belt surface for visible scratches, toner buildup, or dents.
- If you see toner residue on the belt, wipe it gently with a soft, dry cloth. Do not use water or solvents.
- Reinstall the drums and print a test page.
If the belt has physical scratches or dents, it needs replacing.
Common cause: Pulling paper out forcefully during a jam clearance can scratch the belt. If streaks appeared after a paper jam, the belt is the most likely cause.
See: Replacing the Transfer Belt
Step 4: Inspect and Replace the Image Drum
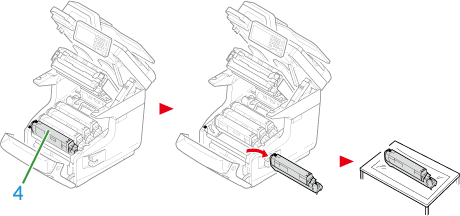
If marks repeat at ~30 mm or ~94 mm intervals and cleaning did not help:
- Remove the drum/toner unit for the affected colour.
- Hold the drum so you can see the green surface. Do not touch it with your fingers.
- Rotate the drum slowly and look for scratches, marks, or embedded particles.
- If the surface is damaged, replace the drum.
Identify the colour: Print separate test pages in cyan, magenta, yellow, and black. The streaks appear only in the colour linked to the damaged drum.
Step 5: Replace the Fuser Unit
If marks repeat at ~85 mm intervals, the fuser roller is damaged:
- The fuser roller cannot be cleaned or repaired — replace the fuser unit.
- Follow the replacement instructions for your printer model.
Prevention
- Clear paper jams carefully. Pull the paper slowly and straight — never at an angle. Rough handling damages the transfer belt and fuser rollers.
- Store paper in a dry environment. Damp paper sheds fibres that collect on the drum and belt.
- Use genuine OKI consumables. Third-party toner can produce excess toner dust that contaminates internal components.
Applies To
All OKI printers supplied by Mediaset: C650, C844, MC853, MC873, MC883, ES8453, ES8473, ES8483, Pro9431.
Related Articles
- How to Generate a Drum Cleaning Page — First step for any streak or line issue
- Black or White Dots on Prints — For individual dots rather than lines or bands
- Black Marks on Back of Page — For marks appearing on the reverse side of the sheet
- General Print Quality Troubleshooting Guide — Start here if you are not sure what type of problem you have
- Replacing the Image Drum
- Replacing the Fuser Unit
Still Having Issues?
If the streaks persist after following these steps, contact Mediaset support. Include a photo or scan of the affected print — a solid colour test page works best for diagnosis.
Mediaset Support: support@mediaset.no
Category: Print Quality Issues Tags: streaks, lines, bands, horizontal lines, periodic marks, image drum, fuser, transfer belt, print quality, OKI Applies to: OKI C650, C844, MC853, MC873, MC883, ES8453, ES8473, ES8483, Pro9431
Last updated: March 2026